List of 59 Chinese Mobile App banned in India
No comments
:
Posted by:
Handy Hack
at
July 07, 2020
Tags:
apps
,
banned
,
Digital Strike
,
mobile
,
playstore
,
tiktok
'India Has Conducted Digital Strike On China'
In a big decision, the government on Monday(29th July) banned 59 Chinese apps. Most of the popular apps such as TikTok, SHAREit, Helo, Likee, WeChat, UC Browser, WeChat, Club Factory, Mi video call and chat. These all china app has been removed from the google playstore.
Here is the complete list:
1. TikTok
2. SHAREit
3. Kwai
4. UC Browser
5. Baidu Maps
6. Shein
7. Clash of Kings
8. DU battery savers
9. Helo
10. Likee
11. YouCam Makeup
12. Mi Community
13. CM Browser
14. Virus cleaner
15. APUS Browser
16. ROMWE
17. Club Factory
18. NewsDog
19. BeautyPlus
20. WeChat
21. UC News
22. QQmail
23. Weibo
24. Xender
25. QQMusic
26. QQ NewsFeed
27. BIGO LIVE
28. SelfieCity
29. Mail Master
30. Parallel Space
31. Mi video call and chat
32. WeSync
33. ES File Explorer
34. VivaVideo
35. Meitu
36. Vigo Video
37. New Video
38. DU Recorder
39. Vault-Hide
40. DU Cache Cleaner
41. DU Cleaner
42. DU Browser
43. HAGO - Play with New Friends
44. CamScanner
45. Clean Master
46. Wonder Camera
47. Photo Wonder
48. QQ Player
49. WeMeet
50. Sweet Selfie
51. Baidu Translate
52. VMate
53. QQ International
54. QQ Security Center
55. QQ launcher
56. UVideo
57. UFly
58. Mobile Legends: Bang Bang
59. DU Privacy
Introduction and Types of the Database Model in DBMS
2 comments
:
Posted by:
Handy Hack
at
June 25, 2020
Tags:
Database
,
DBMS
,
handy hack
,
Hierarchical
,
Model
,
Network
,
Relational
Introduction
Data is nothing but information that becomes in something meaningful.
Database is the meaningful data arranged in a way that the data can be easily accessed, managed and updated.
DBMS stands for Database Management System. DBMS is the system that allows creation, definition and manipulation of database.
The main objective of the DBMS is to store the data to the server and retrieve the data from the database also. It can handle the large amount of data.
Some example of popular DBMS are MySql, Oracle, SQL Server etc.
Highlight: You can also watch below video for better understanding.
Types of Database Model
Database model can be classified into different categories which are describe below:
Hierarchical Model
In hierarchical data model, the data are represented as collection of records where nodes are connected with one to another through parent-child relationship.
Here the restriction of that this model has only one root node and a child node only have a single parent node.
Network Model
Network model is the extended version of hierarchical model. But In this model one child node can have more than one parent node.
Relational Model
This model consists of a collection of table which assigned with a unique name. These table consists of specified numbers of row and column. A row of table represents the relationship among a set of value.
Data is nothing but information that becomes in something meaningful.
Database is the meaningful data arranged in a way that the data can be easily accessed, managed and updated.
DBMS stands for Database Management System. DBMS is the system that allows creation, definition and manipulation of database.
The main objective of the DBMS is to store the data to the server and retrieve the data from the database also. It can handle the large amount of data.
Some example of popular DBMS are MySql, Oracle, SQL Server etc.
Highlight: You can also watch below video for better understanding.
Types of Database Model
Database model can be classified into different categories which are describe below:
1. Hierarchical Model
2. Network Model
3. Relational Model
Hierarchical Model
In hierarchical data model, the data are represented as collection of records where nodes are connected with one to another through parent-child relationship.
Here the restriction of that this model has only one root node and a child node only have a single parent node.
 |
| Hierarchical Model |
Network Model
Network model is the extended version of hierarchical model. But In this model one child node can have more than one parent node.
 |
| Network Model |
Relational Model
This model consists of a collection of table which assigned with a unique name. These table consists of specified numbers of row and column. A row of table represents the relationship among a set of value.
 |
| Relational Model |
How to Find Someone's Exact Location by Sending Link
1 comment
:
Posted by:
Handy Hack
at
May 03, 2020
Tags:
copy
,
find location
,
Gateway
,
grabify
,
hack
,
handy hack
,
ip tracker
,
latitude
,
longttude
,
maps
,
sending link
,
TCP/IP
,
Windows
,
Windows 10
Tracking someone's location should be your pressing need when you wanna know exactly where the person is now. There are various reasons why you might want to find a person's location. Whatever your reason, truth is: We always have a reason to find someone's exact location. Now a days, there are several options are available for tracking somebody's location.
Now, in this article, we will introduce you the easiest way to find someone's location by sending link. Also we will introducing you to a tool, which is called Grabify. Wich basically track IP address for find someone's location.
Let's start,
What is IP address?
The IP full form is - Internet Protocol. In one sentence as a unique ID or number assigned to every user of the internet to help differentiate them.This special number helps in knowing certain things about the person.
So How do We use Grabify to Find Someone's Exact Location ?
It's easy by sending them a link. At first go to Grabify website, and click Register.
After complete Registration, click login. when you login you will redirect logs page. In logs page you see a massage, just click the massage.
After clicking you will redirect the Home page. Find a link to any topic of internet. Copy the link and paste the link into the box that says Enter URL or tracking code you'd see this on the homepage.
After past the URL click on Create URL. You should see a pop up that asks you to agree to their terms of use, you should click agree. If your URL was successfully created, you should now be taken to a new page with a handful of information. your page look like this.
On this new page, there are a couple of customization's you could do to your link. But don't panic, you will go with the defaults.
Your new URL usually looks like https://grabify.link/xyz123. `Copy the URL and send to your victim. when your victim click that link, and he/she saw that page which is you attached, when you create URL. Now you go to Grabify homepage and click on the your tracking code.
Now you should see the Results section, updated with real data about the target that has clicked the link. This includes his/her IP address.
Now you should copy the IP address. Then click IP tracker. In the IP tracker home page paste the IP address into the box that says IP location finder, and click IP lookup.
After clicked IP lookup, you scrolled the page, and you see the Results section, updated with real data about the target. This includes his/her Latitude and Longitude.
Copy the Latitude and Longitude. Open Google maps, and paste on search box and hit Enter. You should see the exact location to your victim.
How can I copy the data of PUBG Mobile and Share it to Another Device
No comments
:
Posted by:
Handy Hack
at
May 02, 2020
Tags:
Android
,
handy hack
,
mobile
,
Obb
,
PUBG
,
PUBG mobile
,
Tencent
Hello Readers,
If you want to know how to share PUBG mobile by xender. Congrats, you are in right place. This information is for you. Here you will get all information about How to copy the data of PUBG Mobile and share it to another device.
It's very simple to copy the data of PUBG Mobile and share it to another device. Just follow my step
1. Go to your internal storage of device--->then go to Android folder---> then go to Obb folder
After that
2. In obb folder search for "Com.tencent.ig"
3.Copy this folder and paste it somewhere else in your Storage.
After this you can send the file and app to another phone via any sharing app.
4. In your another phone install the app and wait till it install. When the installation is completed, it will give you two options. A. "Open" B. "Done". Click Done.
5. After this copy the "Com.tencent.ig" file and past it in Android -->Obb --> Paste.
6. Then open the app, it will Start Working Without asking Additional file download.
How to secure your hard drive in windows
3 comments
:
Posted by:
Handy Hack
at
May 02, 2020
Tags:
BitLocker
,
Computer
,
Data
,
Encrypt
,
Encryption
,
handy hack
,
Microsoft
,
Secure
,
Windows
,
Windows 10
Nowadays, Data is the most important things to us. You need to keep your data safely wherein your data is not about to lost. If you want to secure your data with password, you can. Today I will show you readers how we can secure the data with password. I will suggest you to use BitLocker Drive Encryption.
BitLocker isn't any third party application. BitLocker is volume encryption features included with Microsoft Windows versions starting with Windows Vista up to highest versions. No need to install this, it's already installed as part of operating system installation. We can use BitLocker to secure both internal and external hard drive.
NOTE: BitLocker is not available on Windows 10 Home Edition.
I will show you for Windows 10. Basically for all windows versions are same procedure. We will follow stepwise below
Step 1: Go to Start (Windows button) and search for BitLocker. Then 'Manage BitLocker' will appear on the screen. Tap on 'Manage BitLocker'.
Step 2: You decide first which drive you want to protect and click on 'Turn on BitLocker'
Step 3: Select how you want unlock the drive, either by password or smart card. If you choose password enter the password and click 'Next' button. If you choose smart card insert first your smart card read this article.
Step 4: Choose where you want to save you recovery key if you forget the password this recovery key will help you. I choose 'Save to a file' and save that file then click on 'Next'.
Step 5: Further choose options will shown below. Follow these options and you will get to use BitLocker.
How to make partition a hard drive after installing windows without any software
No comments
:
Posted by:
Handy Hack
at
May 01, 2020
Tags:
Computer
,
Disk
,
Drive
,
Format
,
handy hack
,
Partition
,
Partitioning
,
Windows
,
Windows 10
Disk partition is the concept about logical partition of the hard drive, not about physical partition. At first we should know why we will partition the drive. Using partitioning of disk, you can separate the operating system from your documentary file. Some of reasons, if your operating system installed drive has been corrupted which does not effect to other drive whereas your documentary file has been stored. If we are not going to partitioning, what we have to do? we have to keep our documentary files in operating system drive that would be in risk. If any corrupted issues occur with operating system, your documentary files might be corrupted. So for that reason only we should partition the drive. We can partition after installing the windows. We will see below stepwise how the partitioning the drive
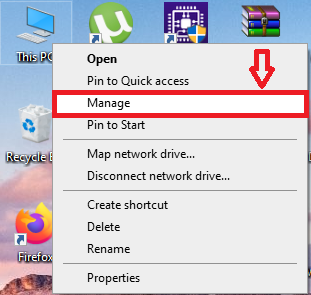
Step 1: Right click on your 'This pc' icon, go to 'manage'

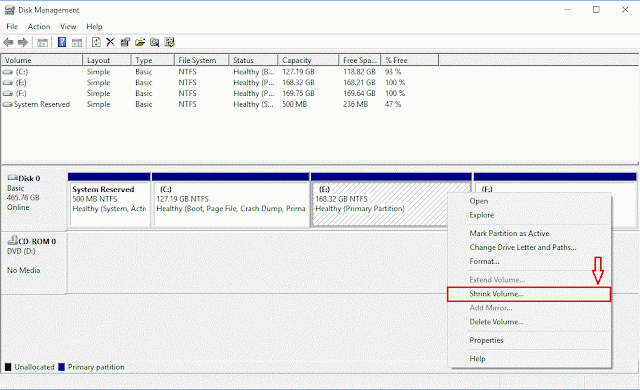
Step 2: Go to Disk Management

Step 3: Right click on the partition and click on 'Shrink Volume'.

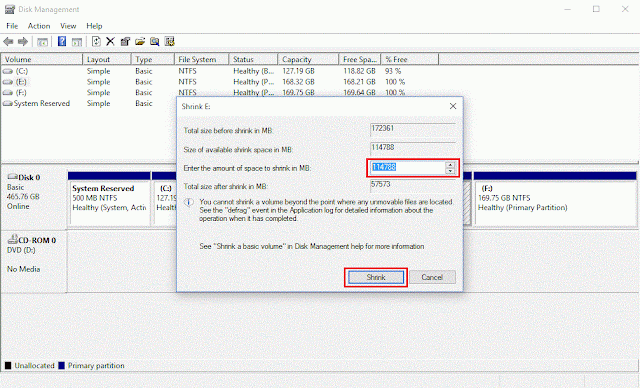
Step 4: Enter the size you wise to shrink the drive. Enter size in megabytes (1024 MB=1 GB). Then click on shrink button

***Note: You can not shrink the volume greater than mention space in size section
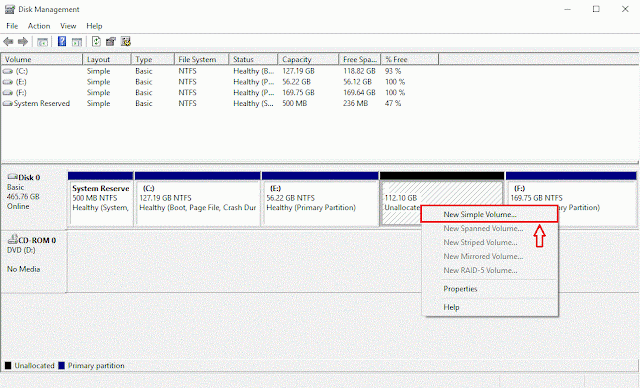
Step 5: Right click on 'unallocated partition' and select on 'new partition volume'. 'The New Simple Volume Wizard' will come. Click on 'Next' button to forward. Enter the memory size to allocate for your new partition and click on 'Next' button.

Step 6: To store data on this partition, you must format it first. Click on 'Next' button with below settings:
File system: NTFS
Allocation unit size: Default
Volume label: Enter your drive name you wish
Click on the checkbox of 'Perform a quick format'

Step 1: Right click on your 'This pc' icon, go to 'manage'

Step 2: Go to Disk Management

Step 3: Right click on the partition and click on 'Shrink Volume'.

Step 4: Enter the size you wise to shrink the drive. Enter size in megabytes (1024 MB=1 GB). Then click on shrink button

***Note: You can not shrink the volume greater than mention space in size section
Step 5: Right click on 'unallocated partition' and select on 'new partition volume'. 'The New Simple Volume Wizard' will come. Click on 'Next' button to forward. Enter the memory size to allocate for your new partition and click on 'Next' button.

Step 6: To store data on this partition, you must format it first. Click on 'Next' button with below settings:
File system: NTFS
Allocation unit size: Default
Volume label: Enter your drive name you wish
Click on the checkbox of 'Perform a quick format'

How to Convert tuple to float value in python - Handy Hack
1 comment
:
Posted by:
Handy Hack
at
April 30, 2020
Tags:
float
,
handy hack
,
program
,
python
,
tuple
Many times, When we working with tuple, we have faced a problem in which we need to convert a tuple to floating point number. In a tuple first element represents integer part and next element represents a decimal part. Now the problem is - How to Convert tuple to float value? Let's discuss the creation way-
Main Method: Using join() + float() + str() + generator expression
Using this method we just convert first tuple element into a string, and then join them and convert them to desire integer.
Source Code:
# Convert tuple to float
# using join() + float() + str() + generator expression
#initialize tuple
tuple = (9,12)
#printing original tuple
print("The original tuple: " + str(tuple))
# Convert tuple to float
# using join() + float() + str() + generator expression
var = float(' . ' . join(str(ele) for ele in tuple))
#print result
print("The float number after conversion from tuple is : " + str(var))
Output:
The original tuple: (9,12)
The float number after conversion from tuple is : 9.12
Note:
1. Concatenate a list of strings into one string: join()
2. Concatenate a list of numbers into one string: join(), str()
Subscribe to:
Comments
(
Atom
)


