How to make partition a hard drive after installing windows without any software
Posted by:
Handy Hack
at
May 01, 2020
Tags:
Computer
,
Disk
,
Drive
,
Format
,
handy hack
,
Partition
,
Partitioning
,
Windows
,
Windows 10
Disk partition is the concept about logical partition of the hard drive, not about physical partition. At first we should know why we will partition the drive. Using partitioning of disk, you can separate the operating system from your documentary file. Some of reasons, if your operating system installed drive has been corrupted which does not effect to other drive whereas your documentary file has been stored. If we are not going to partitioning, what we have to do? we have to keep our documentary files in operating system drive that would be in risk. If any corrupted issues occur with operating system, your documentary files might be corrupted. So for that reason only we should partition the drive. We can partition after installing the windows. We will see below stepwise how the partitioning the drive
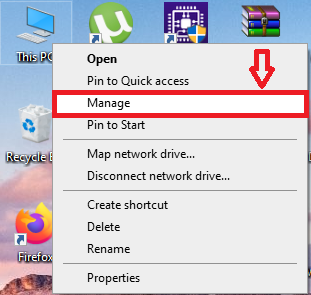
Step 1: Right click on your 'This pc' icon, go to 'manage'

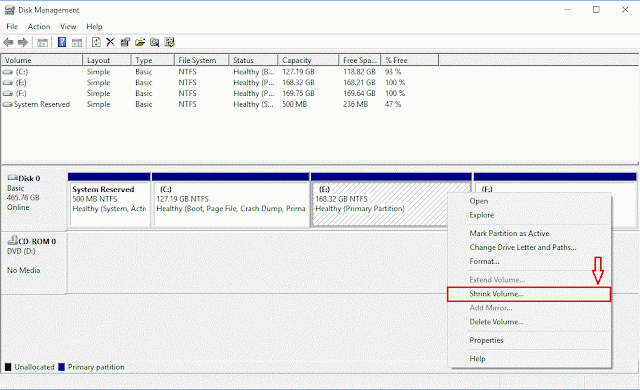
Step 2: Go to Disk Management

Step 3: Right click on the partition and click on 'Shrink Volume'.

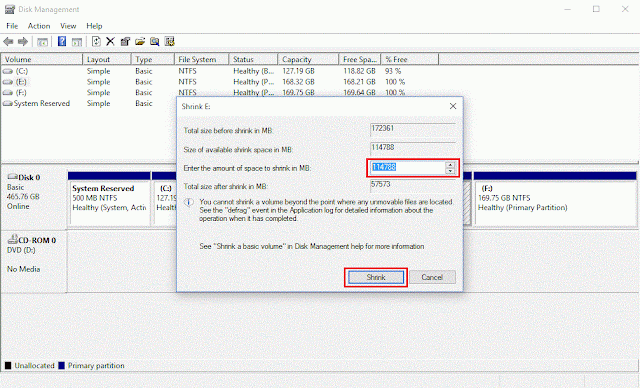
Step 4: Enter the size you wise to shrink the drive. Enter size in megabytes (1024 MB=1 GB). Then click on shrink button

***Note: You can not shrink the volume greater than mention space in size section
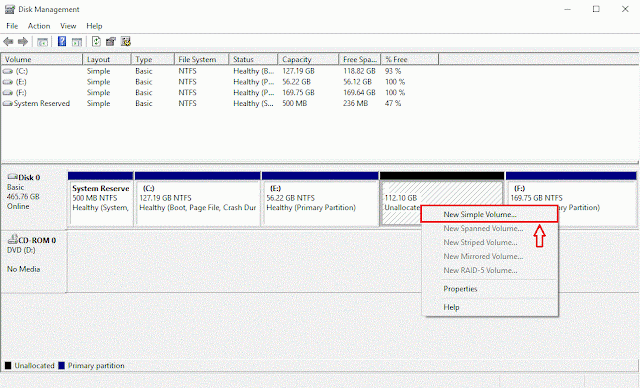
Step 5: Right click on 'unallocated partition' and select on 'new partition volume'. 'The New Simple Volume Wizard' will come. Click on 'Next' button to forward. Enter the memory size to allocate for your new partition and click on 'Next' button.

Step 6: To store data on this partition, you must format it first. Click on 'Next' button with below settings:
File system: NTFS
Allocation unit size: Default
Volume label: Enter your drive name you wish
Click on the checkbox of 'Perform a quick format'

Step 1: Right click on your 'This pc' icon, go to 'manage'

Step 2: Go to Disk Management

Step 3: Right click on the partition and click on 'Shrink Volume'.

Step 4: Enter the size you wise to shrink the drive. Enter size in megabytes (1024 MB=1 GB). Then click on shrink button

***Note: You can not shrink the volume greater than mention space in size section
Step 5: Right click on 'unallocated partition' and select on 'new partition volume'. 'The New Simple Volume Wizard' will come. Click on 'Next' button to forward. Enter the memory size to allocate for your new partition and click on 'Next' button.

Step 6: To store data on this partition, you must format it first. Click on 'Next' button with below settings:
File system: NTFS
Allocation unit size: Default
Volume label: Enter your drive name you wish
Click on the checkbox of 'Perform a quick format'

Subscribe to:
Post Comments
(
Atom
)


No comments :
Post a Comment
If you any Doubts, please comment. I will help you As soon as possible.